DIY Bolo Tie: Basic Assembly Guide at Home (2026)

Breadcrumb
Home > Neckties > Types of Necktie > Bolo Tie
Can you assemble a basic bolo tie at home (and have it look legit)?
Yes—and a DIY bolo tie can look surprisingly polished if you focus on the two pain points that ruin most first attempts: messy cord ends and a slide that won’t stay put. A bolo tie is just three parts working together: a cord, a slide (the decorative clasp), and two tips (the metal ends).
What you’ll make (the “basic” version)
- A simple round cord (leather or synthetic)
- One slide with a clamp or screw-back
- Two cord tips that crimp or glue on
What this guide covers
- Choosing materials that won’t fray or slip
- Step-by-step assembly with common tools
- Getting fit and sizing right so it sits at the right height
- Quick troubleshooting so you don’t waste parts
If you also care about getting the finished proportions right on your body (cord length, slide position, shirt collar spacing), you’ll want to read the related guide, Bolo Tie Buyer's Guide: Materials, Fit, and Sizing—it goes deeper on choosing components by budget and comfort.
What parts and tools do you actually need (and which materials work best)?
The fastest way to waste money is buying parts that don’t match—especially cord diameter vs. slide channel size. Aim for a “basic” build that prioritizes grip and clean finishing.
Core parts (buy before you cut anything)
- Cord (36–42 in / 91–107 cm to start): Most adults can trim down, but you can’t add length back.
- Slide/clasp: Look for a back that either clamps the cord or tightens with screws.
- Tips: Crimp-on tips are easiest; glue-in tips look clean but require careful sizing.
Cord material cheat sheet
- Braided leather: Traditional look and good friction (slide tends to hold better).
- Round leather lace: Sleek but can slip if very smooth; choose a slightly textured finish.
- Waxed cotton/poly cord: Budget-friendly, consistent diameter, easy for beginners.
Tools that make the job easy
- Sharp scissors or a craft knife
- Tape measure or ruler
- Flat-nose pliers (for crimp tips)
- Small screwdriver/Allen key (if your slide uses screws)
- Optional: clear-drying adhesive (for glue-in tips) and a lighter (to seal synthetic cord ends)
Best For Young Adults (18–24): Start with waxed cord and a screw-back slide—cheap to replace, and forgiving if you change your mind on length.
Step-by-step: How to assemble a basic bolo tie (no special skills)
This method works for most common slides and gives you a clean, wearable DIY bolo tie without advanced jewelry tools.
Step 1: Choose your starting cord length
- Cut 36–42 inches of cord for a first build.
- If using synthetic cord, lightly melt the cut ends to prevent fraying (don’t scorch it).
- If using leather, cut cleanly and avoid crushing the end.
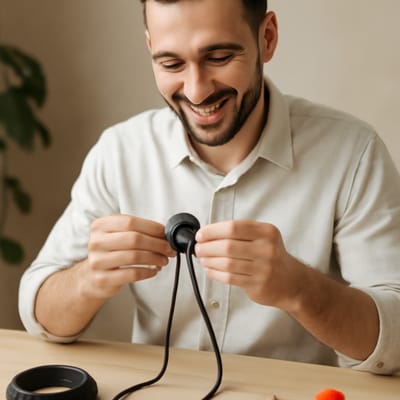
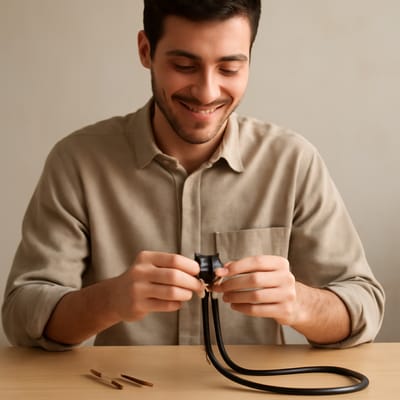
Step 2: Install the slide (before the tips)
- Open the slide back (clamp or screws).
- Feed both cord ends through so the slide sits at the midpoint.
- Tighten the mechanism gradually and test: pull the cord—it should move with effort, not glide freely.
Step 3: Set your “wear position” and mark the ends
Put on a shirt and move the slide where you want it to sit (often near the top button area). Then:
- Even out the tails.
- Mark where you want the tips to begin (most people like 1.5–2.5 inches of tip length).
Step 4: Attach cord tips
- Crimp tips: Slide the tip on, then crimp firmly with flat-nose pliers. Crimp in two spots if possible.
- Glue-in tips: Use a tiny amount of adhesive inside the tip, insert cord, wipe excess, and let cure fully.
Step 5: Final grip check
Wear it for a minute. If the slide creeps down, tighten the clamp/screws or consider a slightly thicker/rougher cord.
Best For Men’s Fashion Enthusiasts: Experiment with cord texture (matte vs. glossy) and tip shape—those two details change the whole vibe while keeping the build simple.
How do you get sizing and fit right so it doesn’t look awkward?
Most “DIY looks homemade” complaints come down to proportions. The good news: you can fix nearly all of it with cord length, slide placement, and tip choice.
Quick fit rules (that work for most builds)
- Slide height: For a classic look, set the slide near the top button area. For casual wear, drop it slightly lower so it feels relaxed.
- Tail length: A common target is tips ending around mid-chest. Too short looks like a mistake; too long can feel costume-like.
- Cord thickness: Thicker cords read more Western and casual; thinner cords look dressier but must match the slide channel.
Common sizing mistakes (and fixes)
- Slide won’t hold position: Your cord is too smooth/thin for the slide’s grip. Switch to a slightly thicker cord or a clamp-style slide.
- Tips flare outward: Tips are too heavy or too wide. Choose slimmer tips or shorten tail length.
- Cord twists: Braided cord helps; so does ensuring both ends exit the slide evenly.
Light buying guidance (so you don’t overpay)
For a first DIY bolo tie, you’ll usually get the best value by buying:
- A mid-priced slide with a reliable clamp/screw back
- Cord sold by diameter (so you can match it)
- Simple metal tips in a finish that matches your buckle/boots/watch
Best For Gift Buyers: Choose neutral finishes (silver-tone, brass-tone) and a medium cord thickness. Also, leave extra cord length so the recipient can trim to taste.
Best For Fashion Bloggers: How to make your DIY bolo tie camera-ready
If you’re creating content, your DIY bolo tie needs to look clean up close. Camera highlights small issues: crooked tips, uneven tails, and visible glue.
Styling details that read “intentional” on camera
- Match metals: Tip finish and slide hardware should match (or be deliberately mixed with a clear reason).
- Symmetry matters: Measure tail length from the bottom of the slide to each tip—don’t eyeball it.
- Avoid shiny glue: If you use glue-in tips, apply adhesive with a toothpick and wipe immediately.
Shoot-friendly build tweaks
- Choose a slide with a defined shape (oval, bar, or engraved plate) so it reads clearly in photos.
- Pick a cord color that contrasts with your shirt. Dark cord on dark shirt disappears.
- If your cord is too reflective, a lightly textured or matte cord reads better in bright light.
Quick outfit pairings that work in posts
If you want a broader styling playbook beyond the DIY build, How to Style a Bolo Tie with Suits, Shirts, and Casual Looks is the natural next step because it breaks down collar types, jacket lapels, and how high to wear the slide.
Done well, a DIY bolo tie becomes a reusable prop: you can swap shirts and jackets while keeping the same accessory, which is perfect for consistent content themes.
Frequently Asked Questions
What’s the easiest cord material for a first DIY bolo tie?
Waxed cotton or waxed synthetic cord is usually the easiest because it resists fraying and stays a consistent diameter, which helps the slide grip.
How long should the cord be on a basic bolo tie?
A safe starting range is 36–42 inches (91–107 cm). You can trim after testing the slide height and tail length on your body.
Why does my bolo tie slide keep slipping down?
Most slips happen when the cord is too smooth or too thin for the slide mechanism. Tighten the clamp/screws, or switch to a slightly thicker, more textured cord.
Can I make a DIY bolo tie without metal tips?
Yes, but it will usually look less finished and may fray faster. If you’re skipping tips, seal synthetic ends carefully or choose cord that won’t unravel.
Is a DIY bolo tie durable enough for everyday wear (men’s fashion enthusiasts)?
It can be, as long as the slide grips consistently and the tips are securely crimped or fully cured with adhesive. Check the slide tightness occasionally.
What’s a good DIY bolo tie approach for young adults experimenting with casual looks?
Use an affordable waxed cord and a simple screw-back slide so you can redo the length and change the vibe without wasting expensive parts.
How can fashion bloggers make a DIY bolo tie look premium on camera?
Keep tails perfectly even, avoid visible glue, and use contrasting cord/shirt colors so the tie reads clearly in photos and video.
What should gift buyers do if they don’t know the recipient’s preferred fit?
Leave extra length and choose a neutral finish (silver-tone or brass-tone). The recipient can trim the cord after trying it with their usual shirts.