How to Tie a Windsor Knot: Step-by-Step Guide 2026

Breadcrumb
How do you tie a Windsor knot without it looking bulky?
The Windsor knot (often called the Full Windsor) is loved for its wide, symmetrical triangle—but the most common frustration is ending up with a knot that’s too big, off-center, or oddly lumpy. The trick is starting with the right setup and using a tie that cooperates.
What you’ll need before you start
- A tie with enough length (most standard ties work; very short ties can struggle)
- A dress shirt you can button comfortably at the neck
- 60 seconds and a mirror (until it becomes muscle memory)
Quick fit rules (so the knot looks intentional)
- Collar opening: A Windsor knot shines with spread and cutaway collars because the knot fills the space.
- Tie thickness: Thinner or medium-weight ties usually create a cleaner Windsor. Very thick fabric can look oversized.
- Knot size goal: The widest point should sit neatly under the collar points without pushing them up.
If you’re deciding between knots, it helps to know that the Windsor is intentionally bigger and more formal than most. That’s why it’s a go-to for interviews, presentations, weddings, and any time you want strong symmetry.
Good to know: If you consistently fight bulk, consider switching to a slimmer tie or using a Half Windsor on thicker fabrics.
Step-by-step: How to tie a Full Windsor knot (mirror-friendly)
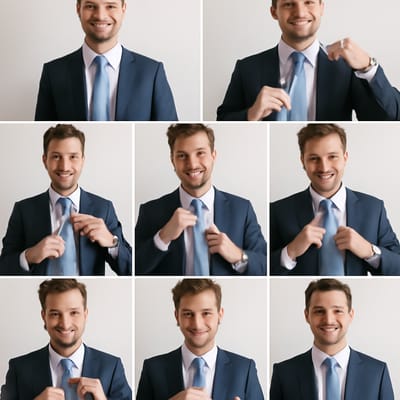
Use these steps for a classic, balanced Full Windsor. The directions assume the wide end is the one you want in front when finished.
1) Set your starting position
- Drape the tie around your neck with the wide end on your right and the narrow end on your left.
- The wide end should hang lower (often around mid-thigh to waist level depending on your height).
2) Cross wide over narrow
Bring the wide end across the front of the narrow end to form an “X” under your chin.
3) Up through the neck loop
Lift the wide end up and pass it through the neck loop (the space between tie and collar), then pull it down.
4) Around the back to the right
Take the wide end behind the narrow end and bring it out to the right side.
5) Up through the neck loop again
Bring the wide end up through the neck loop and pull it down on the right.
6) Across the front (this builds the triangle)
Pass the wide end across the front from right to left. Keep this front band smooth—this is what people see.
7) Up through the neck loop a third time
Bring the wide end up through the neck loop.
8) Down through the front loop
Thread the wide end down through the horizontal loop you created in Step 6.
9) Tighten and center
Hold the knot gently and pull the wide end down to tighten. Slide the knot up toward your collar while keeping it centered.
10) Adjust the length
The tip of the wide end should land around your belt buckle. If it’s too short or long, restart with a higher or lower starting point.
How do you get a sharp dimple and perfect symmetry?

A Windsor knot looks “expensive” when it’s symmetrical, sits flat, and has a clean dimple under the knot. Most issues come from twisting the wide end or tightening too aggressively too early.
Dimple technique (simple and reliable)
- Before final tightening, pinch the wide end just below the knot with your thumb and index finger.
- Keep that pinch as you snug the knot upward.
- Smooth the front blade downward so the dimple stays centered.
Symmetry checklist
- Front band is flat: If the front looks rippled, you likely twisted the wide end during Step 6.
- Knot points match: The left and right “shoulders” of the knot should mirror each other.
- Narrow end is hidden: It should sit behind the wide end and not peek out from the side.
Fixes for common pain points
- Knot is crooked: Loosen slightly, center the knot, then retighten while holding the knot in place.
- Knot is too big: Use a thinner tie or reduce bulk by keeping wraps snug and flat (don’t stack wrinkles).
- Knot slides down: Make sure your shirt collar fits your neck; a loose collar can’t support a structured knot.
Accessory note (optional but useful)
If you wear a Windsor knot regularly in a professional setting, a tie clip can keep the wide end stable and reduce shifting during the day. Place it around mid-chest, attaching the tie to the shirt placket.
Which collars work best with a Windsor knot (and when should you avoid it)?
Collar compatibility is the difference between a Windsor knot looking powerful and it looking like it’s fighting your shirt.
Best collar types for a Windsor knot
- Spread collar: Classic pairing; the knot fills the open space cleanly.
- Cutaway collar: Great for bold, formal looks—especially if you want strong presence.
- Semi-spread: Works well if you want a slightly less dramatic look.
Collars where a Full Windsor can feel “too much”
- Point collar (narrow): The knot can crowd the collar points. You may prefer a smaller knot.
- Button-down collar: Often looks more casual; a big Windsor can feel mismatched.
Occasion and proportion guidance
- If you’re in a suit-and-tie environment, the Windsor knot reads confident and traditional.
- If you’re dressing smart-casual (knit tie, softer shirt), a smaller knot often looks more relaxed.
Best For: Tailors and styling professionals
When you’re dressing clients, the Windsor knot is a fast way to balance a broader face shape or a wider lapel. The key is proportion: wider lapels and spread collars can support the knot; narrow lapels and slim collars usually cannot.
Best For: General fashion enthusiasts
Use the Windsor knot as a style tool: it’s a clean, graphic triangle that pairs well with structured outerwear, crisp shirts, and classic suit silhouettes.
Practice plan + quick upgrades (so it holds all day)
Knowing the steps is one thing; making the Windsor knot look consistent on a busy morning is another. A short practice routine and a couple of small upgrades solve most frustrations.
A 5-minute practice plan
- Day 1–2: Focus only on the sequence. Don’t worry about length perfection.
- Day 3–4: Dial in starting length so the tip lands near the belt buckle.
- Day 5+: Add the dimple and refine symmetry (pinch + smooth).
The “holds all day” checklist
- Collar fit: Your top button should close comfortably; too loose = knot droops.
- Tie fabric: Medium-weight ties typically keep structure without looking bulky.
- Tighten last: Keep the knot slightly loose until the final step, then snug and center.
Best For: Casual to formal dress enthusiasts
If you don’t wear ties daily, keep one tie “practice-ready” at home. Repetition with the same tie builds confidence quickly, and you can switch fabrics later.
Best For: Beginner knot enthusiasts
Start slow and aim for consistency, not speed. Once you can tie it cleanly three times in a row, you’ll naturally get faster.
Optional add-ons (transactional, but genuinely helpful)
- A tie clip for stability during long days
- A compact knot-tying reference card/guide if you travel often
If you’d like a visual walkthrough, turning these steps into a short video you can replay is the fastest way to build muscle memory—especially for centering and dimple control.
Frequently Asked Questions
Is the Windsor knot the same as the Full Windsor?
Yes. When people say “Windsor knot,” they usually mean the Full Windsor, which is wider and more symmetrical than smaller knots.
Why does my Windsor knot look uneven?
Uneven knots usually come from twisting the wide end during the wraps or tightening too early. Loosen slightly, flatten the front band, then retighten while holding the knot centered.
What collar is best for a Windsor knot?
Spread, semi-spread, and cutaway collars are the easiest matches because they leave room for the knot’s width. Narrow point collars can look crowded with a Full Windsor.
How do tailors make a Windsor knot look so crisp on clients?
They focus on proportion (collar spread + lapel width), keep wraps flat, and add a controlled dimple by pinching just below the knot before final tightening.
Can fashion enthusiasts wear a Windsor knot casually?
You can, but it reads more formal by nature. For a relaxed look, pair it with a structured shirt and keep the rest of the outfit clean and simple.
I’m new to tie knots—should I start with a Windsor?
You can, but expect a few tries before it looks consistent. Beginners often learn faster by practicing the sequence first, then adding symmetry and a dimple once the steps feel natural.
How do I keep a Windsor knot from loosening during the day?
Make sure your collar fits, tighten the knot firmly at the end, and consider a tie clip to reduce movement. Slippery fabrics may need a slightly tighter final snug.
What’s the best tie accessory for a Windsor knot?
A tie clip is the most practical daily accessory because it keeps the tie aligned and reduces shifting. Place it mid-chest, attaching the tie to the shirt placket.